Ripping long boards on a table saw is a fundamental woodworking skill that requires precision and care. Whether you’re building furniture or crafting your next DIY project with saw table top, ripping long boards accurately can make all the difference in the outcome of your work. Here are some tips to help you with proper wood ripping techniques and achieve clean rip cuts and straight cuts every time you how to rip long boards on a table saw or cut them.
Mastering the Art of Ripping Long Boards on a Table Saw: Tips and Techniques
Mastering the art of proper ripping techniques on long boards on a table saw requires attention to detail, patience, and proper technique. Choosing the right blade and setting the correct blade height are essential steps to achieving clean and accurate rip cuts throughout. Using a rip fence to guide the rip cut through, making multiple passes per rip cut, and supporting the edge of the board throughout the rip cut, are crucial for preventing mistakes and achieving straight cuts
- Choose the Right Blade: The type of blade you use for ripping long boards is crucial. A blade with a high tooth count will result in a smoother cut, while a blade with fewer teeth will cut more quickly. A thin kerf blade will remove less material, reducing waste and the amount of power needed to make the cut.
- Set the Blade Height: Setting the blade height correctly is essential for accurate cuts. The blade should be set just slightly above the thickness of the board you’re cutting. To do this, lower the blade so it’s just below the surface of the table, then raise it to the appropriate height.
- Use a Rip Fence to Guide Your Cut: A rip fence is an essential tool for guiding your cut and ensuring that it remains straight. Adjust the fence so that it is parallel to the blade, and use it to guide the board through the cut.
- Make Multiple Passes for Accurate Cuts: To achieve accurate cuts, make multiple passes through the board. Begin with a shallow cut and gradually increase the depth with each pass.
- Use a Push Stick or Safety Device to Protect Your Hands: When ripping long boards on a table saw, it’s important to use a push stick or other safety device to protect your hands and keep them away from the blade.
- Properly Support the Board Throughout the Cut: Properly supporting the board throughout the cut will prevent it from bending or sagging, which can result in an inaccurate cut. Use supports or a sawhorse to keep the board level and stable.
- Wear Appropriate Safety Gear: Always wear appropriate safety gear when using a table saw, including eye and ear protection and a dust mask.
- Practice Safe Operating Procedures for Table Saw Use: Familiarize yourself with the safety features and operating procedures of your table saw, and always follow them when using the saw.
- Maintain Your Table Saw for Optimal Performance: Regular maintenance of your table saw will ensure optimal performance and safety. Keep the saw clean and well-lubricated, and have it serviced regularly by a professional.
- Practice and Patience Will Lead to Success: Ripping long boards on a table saw is a skill that takes practice and patience to master. With time and effort, you can achieve great results and take your woodworking projects to the next level.
A Table Saw Is the Best Tool for Ripping Wood

When it comes to ripping wood, a table saw is the best tool for the job. Whether you’re a professional woodworker or a DIY enthusiast,
One of the main advantages of using a table saw for ripping wood is the precision it offers. Unlike other cutting tools, a table saw allows you to adjust the height and angle of the blade, as well as the position of the rip fence,
Another advantage of using a table saws is the speed at which you can make cuts and cut wood. Compared to hand-held saws or other cutting tools, a table saws, is much faster and more efficient to cut wood.
Work on Safe Narrow Rips
Working on narrow rips can be a challenging task, especially when it comes to using proper ripping techniques ensuring safety. However, with the right tools and techniques, you can make narrow rips safely and effectively. Here are some tips to be safe way keep in mind:
- Use a Push Stick: When making narrow rips, it’s important to keep your hands away from the blade. A push stick is an essential tool for this, as it allows you to guide the board through the cut without putting your fingers at risk.
- Adjust the Blade Height: Adjusting the blade height is crucial for narrow rips. The blade should be set just slightly higher than the thickness of the board you’re cutting. This will prevent the blade from cutting too deeply and ensure a clean and accurate cut.
- Use a Thin Kerf Blade: A thin kerf blade removes less material, reducing the chance of kickback and making the cut easier to control. This is especially important for narrow rips, where the risk of kickback is higher.
- Use a Featherboard: A featherboard is a useful tool for keeping the board against the rip fence and preventing it from wandering during the cut. This can help ensure a straight and accurate cut.
- Make Multiple Passes: When making narrow rips, it’s often necessary to make multiple passes through the board. Begin with a shallow cut and gradually increase the depth with each pass.
- Avoid Short Rips: Short rips can be more dangerous than long rips, as there is less support for the board. Whenever possible, avoid making short rips and instead cut longer boards to the desired length.
- Wear Appropriate Safety Gear: Always wear appropriate safety gear when working with a table saw, including eye and ear protection and a dust mask.
- Practice Safe Operating Procedures: Familiarize yourself with the safety features and operating procedures of your table saw, and always follow them when using the saw.
Install the Blade Guard

Installing the blade guard on a table saw is an important, safety equipment first step that should not be overlooked. The blade guard helps to prevent accidents by enclosing the blade safe cutting it, and also helps to reduce dust and debris on safety equipment. Here are some steps to follow to install the blade guard on your table saws:
- Turn off the saw and unplug it from the power source.
- Locate the blade guard assembly. This will typically consist of a clear plastic guard, a mounting bracket, and a spring-loaded arm that holds the guard in place.
- Install the mounting bracket onto the saw. This will usually involve attaching it to the riving knife or splitter on the back of the blade assembly.
- Attach the clear plastic guard to the mounting bracket. This may involve sliding it into place or securing it with screws.
- Attach the spring-loaded arm to the mounting bracket. This arm will hold the guard in place and allow it to move up and down as needed.
- Test the blade guard to ensure that it moves freely and stays in place when needed.
- Make any necessary adjustments to the blade guard to ensure that it is aligned properly with the blade and provides adequate clearance.
- Double-check that the guard is securely attached and functioning properly before using the saw.
Project step-by-step (6)
Project Step-by-Step: Building a Bookshelf
Step 6: Sand and Finish the Bookshelf
After the construction of the bookshelf is complete, the next step is to sand and finish the plywood along the edge of the directly behind it. This step will give the plywood along the edge of the directly behind the bookshelf a smooth and attractive surface, and will also help protect the grain of the wood from damage.
- Start by sanding the entire surface of the bookshelf with coarse-grit sandpaper, such as 80-grit or 100-grit. This will help remove any rough spots, scratches, or other imperfections in the wood.
- Once the rough sanding is complete, switch to a finer-grit sandpaper, such as 120-grit or 150-grit, and sand the bookshelf again. This will help smooth out the surface and remove any remaining marks from the coarse-grit sandpaper.
- After the surface is smooth, wipe down the bookshelf with a damp cloth to remove any sawdust or debris.
- Apply a wood conditioner to the bookshelf. This will help the wood absorb the stain more evenly and prevent blotching. Follow the manufacturer’s instructions for application and drying times.
- Once the wood conditioner has dried, apply the stain to the bookshelf using a brush or rag. Be sure to work the stain into the wood evenly and wipe away any excess with a clean cloth.
- Allow the stain to dry completely before applying a clear protective finish, such as polyurethane or lacquer. Apply the finish in thin, even coats and allow each coat to dry completely before applying the next.
- Once the final coat of finish is dry, inspect the bookshelf for any spots that may need touch-up sanding or additional coats of finish. Once you are satisfied with the finish, the bookshelf is complete and ready to be used!
More Safety: Watch Out for Kickback
When working with a table saw, kickback is a dangerous and potentially life-threatening hazard that must be taken seriously. Kickback occurs when the edge of a piece of wood is thrown back at high speed from the saw, often due to the wood binding against pressure from the tip of the blade or being improperly positioned on the edge of the table.
To get better grip, avoid kickback and keep yourself safe when using a table saw, follow these tips:
- Always use a push stick or push block to guide the wood through the saw, especially when making narrow cuts or cuts that require the use of your hands near the blade.
- Keep the blade sharp and properly aligned with the fence to reduce the risk of binding and kickback.
- Never stand directly in line with the blade, as this puts you in the path of any flying wood in case of kickback.
- Use a splitter or riving knife to help prevent the wood from binding against the blade and reduce the risk of kickback.
- Avoid cutting small or irregularly shaped pieces of wood that are difficult to control and may increase the risk of kickback.
- Use a feather board to help guide the wood through the saw and keep it in place against the fence.
- Always wear appropriate safety gear, such as eye and ear protection, and keep your workspace clean and free of clutter to avoid accidents.
Choose the Right Saw Blade
Choosing the right saw blade for your table saw is essential for achieving clean and accurate cuts. There are several factors to consider when selecting a saw blade, including the type of material you are cutting, the wood grain, and thickness of the material, and the type steady rate of cut you need to make.
Here are some tips for choosing the right saw blade:
- Material: Different blades are designed to cut different materials. For example, a blade with fewer teeth and larger gullets is better suited for cutting through thick hardwoods, while a blade with more teeth and smaller gullets is better for cutting thin sheet goods and plywood.
- Blade Size: The size of the blade you choose will depend on the size of your saw and the type of cuts you need to make. A larger blade will allow you to make deeper cuts, while a smaller blade will give you more control and accuracy.
- Tooth Configuration: Saw blades come with different tooth configurations, including flat-top, alternate top bevel, and triple chip. The tooth configuration will determine the type of cut the blade is best suited for, such as ripping or cross-cutting.
- Kerf Size: The kerf is the width of the cut made by the blade. A wider kerf will remove more material, but will also require more power and produce more waste. A narrower kerf will produce less waste and require less power, but may not be as effective for cutting thicker materials.
- Quality: Choose a high-quality saw blade from a reputable manufacturer. A good saw blade will last longer, produce cleaner cuts, and reduce the risk of kickback or other safety hazards.
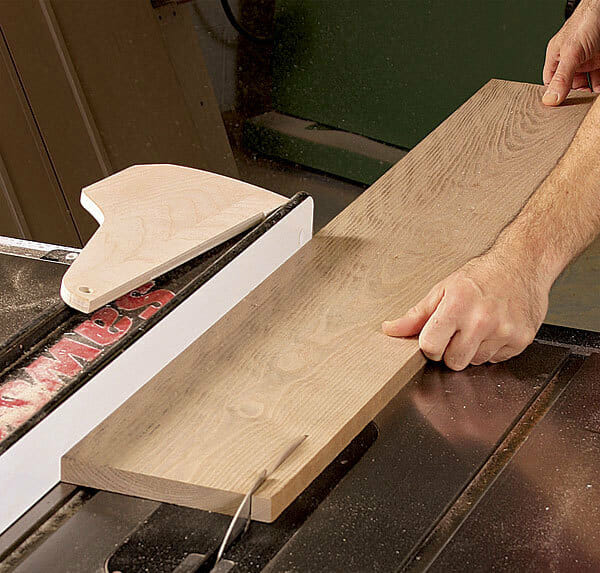
Keep Boards Tight To the Fence
One of the most important things to keep in mind when using a fence extension a table saw is to keep the boards tight to the fence extension. This is essential for making accurate and straight cuts, and it can also help prevent kickback and other safety hazards.
Here are some more options and some tips for keeping your boards tight to the fence:
- Use a push stick or push block to guide the board through the saw. This will help keep the board in contact with the fence and reduce the risk of it wandering or shifting during the cut.
- Adjust the fence so that it is parallel to the blade. This will ensure that the board is guided straight through the saw and comes out with a straight cut.
- Make sure the board is fully supported on both sides of the saw. This will help prevent it from tipping or shifting during the cut.
- Use a feather board to hold the board tight against the fence. This will help prevent the board from wandering or shifting during the cut, and it can also help prevent kickback.
- Keep your hands clear of the blade and use a push stick or push block to guide the board through the saw. This will give you better control over the board and reduce the risk of accidents.
A helping hand for long stock
When ripping long stock on a table saw, it can be challenging to keep the board straight and prevent the stock on it from tipping or shifting during the cut. This is especially true if you are working alone or if the stock on the board is particularly heavy.
Here are some tips for using a helping hand when ripping long stock:
- Use an outfeed table or roller stand to support the board as it exits the saw. This will help prevent it from tipping or shifting and can also reduce the risk of kickback.
- Ask a friend or coworker to help guide the board through the saw. This can be especially helpful when working with particularly long or heavy boards.
- Use a clamp or hold-down to secure the board to the saw table. This will help prevent it from moving during the cut and can also help prevent kickback.
- Use a feather board to hold the board tight against the fence. This will help prevent the board from wandering or shifting during the cut, and it can also help prevent kickback.
- Consider using a jigsaw or circular saw to make rough cuts before using the table saw. This can help reduce the amount of material you need to remove on the table saw and make it easier to handle the board during the cut.
Set Blade Height
Setting the blade height is an important step when ripping long boards on a table saw. The height and direction of the blade tip determines how deep the cut will be, and it’s essential to set the blade tip at the right height to ensure a clean and accurate cut.
Here are some tips for setting the blade height when ripping long boards:
- Adjust the blade height so that it’s just slightly higher than the thickness of the board you’re cutting. This will ensure that the blade cuts cleanly through the board without burning or splintering the edges.
- Check the blade height before every cut. Even small changes in the blade height can affect the quality of the cut, so it’s important to make sure the blade is at the correct height for each cut.
- Use a scrap piece of wood to test the blade height before making your cut. This will help you ensure that the blade is set at the right height and that the cut will be clean and accurate.
- Be sure to lower the blade fully below the surface of the table when you’re finished with your cut. This will help prevent accidents and ensure the safety of yourself and others in your workspace.
Ripping Thin Strips Safely
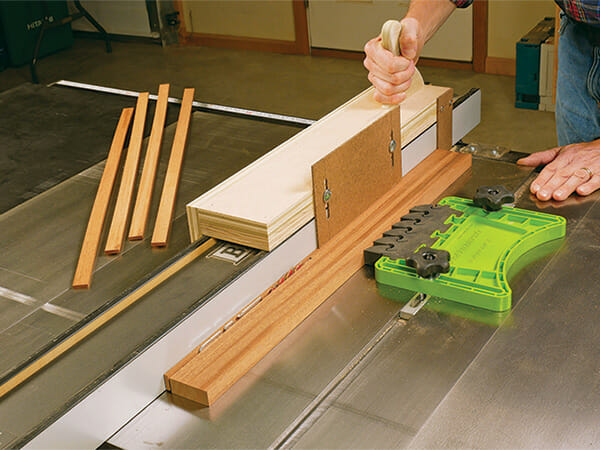
Ripping thin strips ripping wood on a narrow stock with a table saw can be a challenging and potentially dangerous task. Thin strips can easily bind in the saw blade, causing kickback or other safety hazards. However, with the right techniques and precautions, you can rip thin strips safely and accurately.
Here are some tips for making rip cuts and ripping thin strips safely on a table saw:
- Use a push stick or push block to guide the board through the saw. This will help keep your hands a safe distance from the blade and prevent the thin strip from binding.
- Use a feather board to hold the board tight against the fence. This will help prevent the board from wandering or shifting during the cut and can also help prevent kickback.
- Use a zero-clearance insert in your saw table to prevent the thin strip from falling into the gap around the blade. This will help keep the strip straight and prevent binding.
- Use a crosscut sled to make the cut. A crosscut sled provides a stable base for the board and allows you to make precise cuts without the risk of binding or kickback.
- Consider using a sacrificial board. A sacrificial board can be clamped to the fence and used to guide the thin strip through the saw. This can help prevent the thin strip from binding and provide additional support.
Set Featherboard
A featherboard is a simple and effective tool that helps to hold a workpiece tight against the fence and table of a table saw. By keeping pressure on the workpiece in place, it can help to prevent kickback and ensure an accurate and safe cut.
Here are some tips for setting up a featherboard on a table saw:
- Choose the right featherboard for your saw. Featherboards come in different sizes and shapes, so make sure to choose one that is appropriate for your saw and the type of cut you are making.
- Position the featherboard so that it presses against the workpiece and holds it firmly against the fence. The featherboard should be set up before the blade and adjusted so that it is snug but not too tight.
- Make sure the featherboard is perpendicular to the table and fence. This will ensure that the workpiece is held in place at a consistent angle throughout the cut.
- Set the featherboard so that it applies pressure just before the blade. This will help prevent the workpiece from lifting and reduce the risk of kickback.
- Test the setup by running a scrap piece of wood through the saw. Make sure the featherboard holds the workpiece securely and doesn’t interfere with the blade or the cut.
Push sticks and pads
Push sticks and pads are essential tools for safe and accurate cuts on a table saw. They allow you to guide the workpiece through the saw while keeping your hands at a safe distance from the blade. Here are some tips for using push sticks and pads:
- Choose the right tool for the job. There are many different types of push sticks and pads available, each designed for different types of cuts and workpieces. Make sure to choose one that is appropriate for your saw and the type of cut you are making.
- Position the push stick or pad so that it provides a firm grip on the workpiece. The tool should be held at a 45-degree angle to the workpiece and should be positioned so that it pushes the workpiece through the saw.
- Keep your hands a safe distance from the blade. Make sure to keep your hands and fingers well away from the blade at all times.
- Use a push stick or pad for every cut. Even if the workpiece is large or awkwardly shaped, always use a push stick or pad to guide it through the saw.
- Practice proper technique. When using a push stick or pad, use a smooth, even motion to guide the workpiece through the saw. Avoid jerky or sudden movements, which can cause the workpiece to shift or bind.
Set the Table Saw Fence
Setting the table saw fence correctly is crucial for accurate and safe cuts on a table saw. Here are some tips for setting the fence:
- Measure the distance between the blade and the fence. Use a tape measure or ruler to measure the distance between the blade and the fence. Make sure the measurement is consistent along the entire length of the blade.
- Adjust the fence to the correct position. Use the adjustment mechanism on your saw to move the fence into the correct position. Make sure the fence is parallel to the blade and the correct distance from the blade for the cut you are making.
- Lock the fence in place. Once the fence is in the correct position, use the locking mechanism on your saw to secure it in place. Make sure the fence is tight and doesn’t move during the cut.
- Test the setup by running a scrap piece of wood through the saw. Make sure the cut is accurate and the workpiece doesn’t bind or kickback.
- Check the fence frequently during the cut. As you make the cut, make sure the fence stays in place and doesn’t shift. If you notice any movement, stop the saw and adjust the fence before continuing.
Rip Board
Ripping a board on a table saw involves cutting it lengthwise, parallel to the wood grain throughout. Here are the steps to rip a board on a table saw:
- Set the blade height. Adjust the blade height so that it is just higher than the thickness of the board you are cutting.
- Set the fence. Measure the distance between the blade and the fence and adjust the fence to the correct position for the width of the board you are cutting. Lock the fence in place.
- Install the blade guard and splitter. Make sure the blade guard and splitter are installed and functioning properly.
- Use a push stick or pad. Place the board on the table saw and use a push stick or pad to guide it through the saw. Keep your hands a safe distance from the blade.
- Start the cut. Turn on the saw and slowly push the board through the blade, keeping it tight against the fence.
- Complete the cut. Once the cut is complete, turn off the saw and wait for the blade to come to a complete stop before removing the board.
- Check the board for accuracy. Check the board for straightness and accuracy. If necessary, use a jointer or planer to flatten and square the edges.
Save Your Fingers With a Push Stick
A push stick is an essential safety tool when using a table saw. It helps keep your fingers a safe distance from the blade while guiding the workpiece through the saw. Here’s how to use a push stick:
- Hold the push stick firmly. Make sure you have a good grip on the push stick before starting the cut.
- Position the workpiece. Place the workpiece on the saw table, with the end against the fence and the opposite end resting on the saw’s surface.
- Position the push stick. Hold the push stick with your dominant hand and position it so that the flat end is against the workpiece and the angled end is facing up.
- Push the workpiece through the saw. Using the push stick, guide the workpiece through the saw. Keep the push stick in contact with the workpiece at all times and apply even pressure.
Support Long Rips With an Outfeed Table
When ripping long boards on a table saw, it’s important to have a support system in place to prevent the board from sagging and causing kickback. An outfeed table is a great solution for providing support for long rips. Here’s how to set up an outfeed table:
- Measure and cut the outfeed table. The outfeed table should be the same height as the saw table and should extend beyond the back of the saw by at least the length of the longest board you will be ripping. Cut the table to the desired length and width.
- Mount the outfeed table. Attach the outfeed table to the saw or to a separate stand, making sure it is level with the saw table and securely attached.
- Adjust the height of the outfeed table. The outfeed table should be level with the saw table to provide smooth support for the workpiece. Adjust the height of the outfeed table as necessary.
- Test the setup. Before starting your rip, test the setup by running a scrap board through the saw to ensure that it passes smoothly over the outfeed table.
Mark the Workpiece for Cutting

Before making any cuts on a table saw, it’s important to mark your workpiece to ensure accurate cuts. Here’s how to mark your workpiece for cutting:
- Measure the width of the cut. Use a tape measure or ruler to determine the width of the cut you need to make on your workpiece.
- Mark the cut line. Use a pencil to mark the cut line on the workpiece. Make sure the line is straight and consistent, and that it matches the measurement you took in step 1.
- Double-check your measurements. Before making any cuts, double-check your measurements and make sure your cut line is accurate.
- Make any necessary adjustments. If your cut line is not accurate, adjust it as necessary until you are satisfied with the placement.
Cuts on Thick Wood
Making cuts on thick wood with a table saw requires some additional steps to ensure safe and accurate cuts. Here are some tips for safe cutting of thick wood on a table saw:
- Adjust the blade height. Before making any cuts, adjust the height of the blade to the correct depth for the thickness of the wood you are cutting. The blade should only extend about 1/4″ above the wood.
- Use a rip blade. A rip blade is designed for cutting with the grain of the wood and is best for making cuts on thick wood. The teeth on a rip blade are more aggressive than those on a crosscut blade, which makes them more effective at cutting through thick wood.
- Make multiple passes. It’s generally safer and more effective to make multiple passes when cutting thick wood, rather than trying to make the cut in a single pass. Make the first pass with the blade set low, and then raise it a little for each subsequent pass until you reach the desired depth.
- Use a push stick. When making cuts on thick wood, it’s important to keep your hands a safe distance away from the blade. Use a push stick to guide the wood through the saw, and keep your hands well clear of the blade.
FAQS
Q: What safety gear should I wear when using a table saw? A: You should always wear eye protection, ear protection safety glasses, and gloves when using a table saw. A dust mask is also recommended to protect against sawdust.
Q: How do I prevent kickback on a table saw? A: Kickback can be prevented by using a blade guard, a riving knife, and a splitter. It’s also important to use a push stick to guide the wood through the saw and keep your hands a safe distance away from the blade.
Q: What type of blade should I use for ripping wood on a table saw? A: For ripping wood, a rip blade is the best choice. Rip blades have fewer teeth than crosscut blades, and the teeth are designed to remove material quickly with the grain of the wood.
Q: How do I set the blade height on a table saw? A: To set the blade height, unplug the saw and loosen the blade adjustment lock. Raise or lower the blade until it’s at the desired height, and then tighten the blade adjustment lock.
Q: How do I ensure accurate cuts on plywood with a table saw? A: To ensure accurate cuts, use a fence to guide the wood through the saw, and mark the cut line on the wood before making any cuts. Double-check your measurements and make any necessary adjustments before making the cut.
Q: Can I use a table saw to cut metal? A: While some table saws can be used to cut metal, it’s generally not recommended. Metal cutting requires a specialized blade and can be dangerous due to the risk of sparks and flying debris. It’s best to use a metal-cutting saw for this type of work.
conclusion,
Using a table saw to rip long boards is a great way to achieve accurate and consistent cuts. However, it’s important to prioritize safety and take the necessary precautions to prevent accidents. Always wear proper safety gear, such as eye and ear and eye protection too, and use a blade guard, riving knife, and splitter to prevent kickback. Set the blade height and fence correctly, use push sticks and pads, and consider using an outfeed table for support. By following these tips and techniques, you can safely and efficiently rip long boards on a table saw. Remember to always read the manufacturer’s instructions and guidelines before operating any power tool, and seek professional advice if you’re unsure about how to use a table saw safely.