How to Measure Chain Saw. you need to count the number of complete links in a section of the chain, typically three or four links, and measure the distance between the centers of the pins that hold the links together. Then, you divide this distance by two to get the pitch of the chain.
For example, if you measure the distance between the centers of three rivets and get a measurement of 0.5 inches, dividing this by two gives you a pitch of 0.25 inches. This pitch measurement is important because it determines the compatibility of the chain with sprockets and other chain components.
It is important to note that pitch measurement is just one of several factors to consider when selecting a chain, and other factors such as the blade speed, roller diameter, plate thickness, and tensile strength should also be taken into account. Additionally, different types of chains, such as timing chains or leaf chains, may require different methods of measurement.
Mastering Chain Measurement: A Guide to Finding the Right Size for Your Chainsaw
When it comes to how to use a scroll saw and finding the measurements of a chainsaw, the first thing to do is to look at the side of the bar near the user end. The chainsaw bar is the long metal blade that the chain is wrapped around, while the user end refers to the the wood casing around the motor where the handle is located.
Most chainsaws have their measurements stamped on the right side of the bar, but it’s worth noting that the exact location of the measurements may vary depending on the manufacturer of the chainsaw bar. By locating and reading the measurements, you can determine the length of the chainsaw bar, the pitch of the chain, and the gauge of the chain, which are all crucial factors to consider when selecting the right chain for your chainsaw.
Drive Link Number: How to Identify and Find It Next to the Image on Your Chainsaw Chain
The drive link number is an essential aspect to consider when selecting a chainsaw chain that fits your chainsaw bar. To identify the number of drive links on a chainsaw chain, look for an image of a shark’s tooth or an inverted triangle with two circles in the top corners. The number that appears next to this image represents the number of driver links present in the chainsaw chain. In some cases, you may also find a number next to the letters “DL” instead of a driver link image. For example, if the bar of your chainsaw contains the phrase “72DL,” it means that your chainsaw chain has 72 drive links. By understanding how to identify and locate the drive link number,
Millimeters or Inches: How to Identify the Dual Measurement Number on Your Chainsaw Bar
The gauge of a chainsaw chain is an important measurement that determines the thickness of the chain drive links. This measurement is typically printed on the chainsaw bar and can be found to the right of either the brand name or the drive link number. It is usually represented in both metric and imperial units, such as millimeters and inches. For instance, if your chainsaw reads “.050/1.3,” it means that the chain saw blade’s gauge is .050 inches (1.3 mm). In some cases, you may also find an image of a bar groove next to the gauge measurement. By identifying and understanding the gauge measurement, you can select the appropriate chainsaw chain that fits your chainsaw bar and drive links.
DIY Guide: How to Measure Your Chainsaw Chain Manually and Accurately
Measuring your chainsaw chain manually is a simple and straightforward process that requires only a ruler or a tape measure. First, locate the drive link on pin end of your chainsaw chain, which is the small metal piece that fits into the bar groove. Then, use a ruler to measure the distance between three consecutive drive links. Make sure to measure from the center of the first drive link to the center of the third drive link, and divide the result by two. This measurement is known as the pitch, which is an essential aspect to consider when selecting the correct chainsaw chain for your saw. Additionally, you can also measure the gauge of your chainsaw chain by using a caliper or a coin to determine the thickness of the drive links. By following these simple steps, you can accurately measure your chainsaw chain manually and ensure that you select the appropriate replacement chain for your saw.
Front to Tip Measurement: How to Find the Length of Your Chainsaw Bar
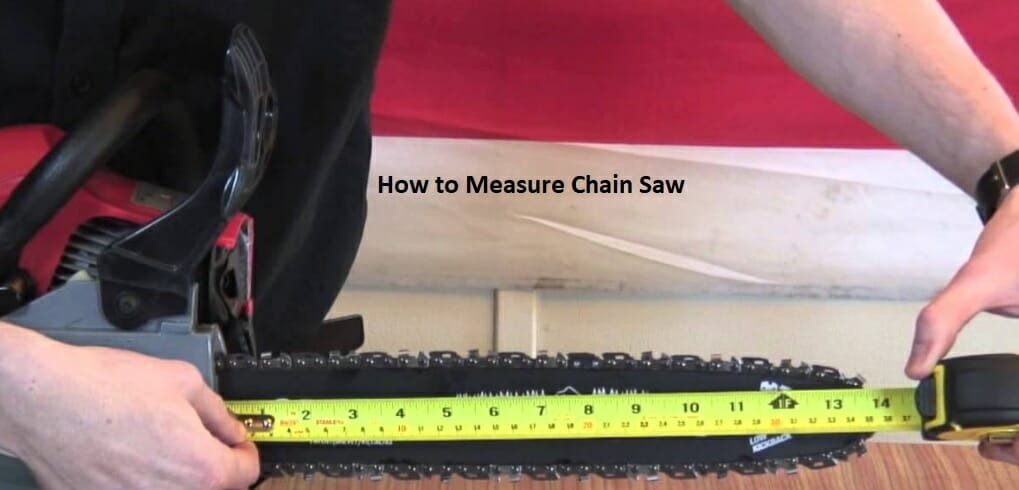
To determine the length of the blade cuts your chainsaw bar, start by placing one end of a tape measure at the point where the motor casing ends and the metal blade begins. Then, use the tape measure to determine the distance from this point to the furthest cutting tip, and round up the measurement to the nearest even number in inches. This final number is the length of your chainsaw bar flat blades, also known as the called length.
- It is important to note that chainsaws come in various types and sizes, with different typical bar lengths. Light-duty chainsaws typically range from 10 to 14 inches (25 to 36 cm),
- while heavy-duty chainsaws usually have bar lengths between 14 to 18 inches (36 to 46 cm).
- In some cases, the chainsaw bar may also be referred to as the chainsaw blade, but they both refer to the same thing.
How to Find the Pitch of Your Chainsaw Chain by Gauging the Length Between Rivets
When it comes to measuring the pitch blade tension of your chainsaw chain, counting the rivets and measuring the distance between them is a simple and effective method. The pitch refers to the distance between the blades of any three consecutive rivets on the chain divided by two.
- For example, if the distance between three rivets is 1 inch (2.5 cm), the pitch would be 1/2 inch (1.3 cm)
- The most common pitch measurements for chainsaw chains are 3/8 inch (0.95 cm) and .325 inches (0.83 cm). By measuring the pitch of your chainsaw chain, you can ensure that you are using the correct replacement chain and that your chainsaw is running optimally.
Drive Link Counting Made Easy: Learn How to Remove Chains and Determine the Number of Links with Ease
it’s essential to know how to count the drive links on your scroll saw chain. Fortunately, it’s a relatively simple process that can be completed with just a few tools. Typically, chainsaw chains have between 66 and 72 drive links, with 16-inch bars usually having 66 drive links and 18-inch bars having 72. To make counting the drive links easier,
To determine the number of drive links on your chainsaw chain, follow these easy steps:
- Use a wrench to remove the guide bar side panel.
- Use a screwdriver to release the tension on the chain.
- Pop the chain off the bar.
- Lay the chain down on a flat surface and align the driver links directly across from each other.
- Count the pairs of driver links to determine the number of drive links on your chain.
- Typically, chainsaw chains have between 66 and 72 drive links. 16-inch bars usually have 66 drive links, while 18-inch bars usually have 72.
- Remember to wear thick safety gloves during this step to minimize your risk of injury.
Accurate Chainsaw Maintenance: Learn How to Measure Drive Link Thickness with a Dial Caliper!
To determine the gauge of your chainsaw chain, follow these steps using a dial caliper:
- Close the jaws of your caliper around the drive link.
- Read the value on the scale to find the measurement, which will give you the chain’s gauge.
- The most common gauge measurements are .050 inches (0.13 cm), .058 inches (0.15 cm), and .063 inches (0.16 cm). By measuring the gauge of your chainsaw chain, you can ensure that it’s the correct size for your chainsaw, and you can also ensure that it’s working efficiently and effectively. This simple process can be completed with just a dial caliper, making chainsaw maintenance a breeze.
Checking Compatibility of the Chain Saw Parts
After taking the measurements of modern scroll saws the guide bar, chain pitch, and chain gauge, it is important to check the compatibility of the chain saw parts. This step ensures that the new chain or guide bar is the correct fit for the chain saw. Checking compatibility involves verifying that the length, pitch, and gauge of the new chain match the measurements taken from the old chain or guide bar. It is also important to ensure that the new chain or guide bar is compatible with the specific make and model of the chain saw. Using incompatible parts can cause damage to the chain saw and compromise safety while in use. Therefore, checking compatibility is a crucial step in measuring a chain saw and replacing its parts.
Ensure that the chain saw parts are compatible with the measurements taken
To ensure that the chain and scroll saws or parts are compatible with the measurements taken, it is important to compare the measurements with the specifications provided by the manufacturer of the chain saw or the replacement parts.
The specifications will outline the correct length, pitch, and gauge of the chain saw blades or guide bar required for the specific make and model of the chain saw. If the measurements taken match the specifications provided, the replacement parts should be compatible with the chain saw.
However, it is always a good idea to double-check and verify the compatibility before installing the new parts. Using incompatible parts can cause damage to the chain saw and compromise safety while in use. Therefore, taking the time to ensure compatibility is a crucial step in replacing chain saw parts.
Conclusion
In conclusion, measuring a chain saw before replacing its parts is crucial to ensure that the new parts fit properly and function safely. The process involves taking accurate measurements of the guide bar length, chain pitch, and chain gauge. Using the right tools and equipment, such as a guide bar measuring tool, chain pitch gauge, and chain gauge tool, can help to ensure the accuracy of the measurements. After taking the measurements, it is important to check the compatibility of the replacement parts with the specifications provided by the the saw blade manufacturer. Using incompatible parts can cause damage to the chain saw and compromise safety while in use. Therefore, taking the time to measure and ensure compatibility is an important step in maintaining a safe and efficient chain saw.
Importance of proper chain saw measurement
Proper chain saw measurement is crucial for maintaining the safe and efficient operation of the tool. Using an incorrect chain or guide bar can cause the chain saw to malfunction, resulting in damage to the tool, injury to the user, or damage to the property being worked on. Using a chain that is too long, too short, or has the wrong pitch or gauge can also cause the chain to slip or break during operation,
Benefits of accurate chain saw measurements
Accurate chain saw measurements offer several benefits, including:
- Improved Safety: Properly measuring a chain saw helps to ensure that the tool is functioning safely and prevents accidents caused by malfunctions or improperly sized components.
- Enhanced Performance: Using the correct chain or guide bar improves the performance of the chain saw by reducing vibration, improving accuracy, and extending the life of the tool.
- Cost-Effective: Replacing only the parts that need to be replaced with the correct measurements helps save money in the long run by avoiding costly repairs or replacement of damaged parts.
- Time-Saving: Using accurately sized components saves time by preventing the need for adjustments and reducing the amount of time spent troubleshooting malfunctions.
- Ease of Use: Accurate measurements help to ensure that the chain saw is properly balanced and easier to handle, which reduces fatigue and strain on the user.
FAQS
- What tools do I need to measure a chain saw?
- You will need a guide bar measuring tool, chain pitch gauge, and chain gauge tool.
- Why is it important to measure a chain saw before replacing its parts?
- It is important to measure a chain saw to ensure that the replacement parts fit properly and function safely. Using an incorrect chain or guide bar can cause the chain saw to malfunction, resulting in damage to the tool, injury to the user, or damage to the property being worked on.
- How do I measure the length of the guide bar?
- Remove the guide bar from the chain saw, place the guide bar measuring tool at the tip of the guide bar, and measure the length of the guide bar.
- How do I determine the pitch of the chain?
- Count the number of drive links in the chain and determine the pitch of the chain using the chain pitch gauge.
- How do I determine the gauge of the chain? Determine the gauge of the chain using the chain gauge tool.
- How do I check the compatibility of the chain saw parts?
- Compare the measurements taken with the specifications provided by the manufacturer of the chain saw or the replacement parts. If the measurements taken match the specifications provided, the replacement parts should be compatible with the chain saw.